Hi, everyone. I'm Hye living in America and have been renovating my house since last year. I barely knew about power tools and house stuff before I had my own house. But for the past year I've learned a lot by myself and achieved quite a few DIY projects. So I wanted to share my experiences and help out any others here who wants to do house DIY projects. However, I'm still learning a lot and am not perfect nor have I mastered everything. It's just what I have done for my house and has worked fine for me. So even though what I'm going to post in the future is not the pro-skilled way, please understand that or you can also tell me what you think is correct and share with it me in the comments!
All right! then Let me start my very first post now :)
How I cut plywood for my DIY project.
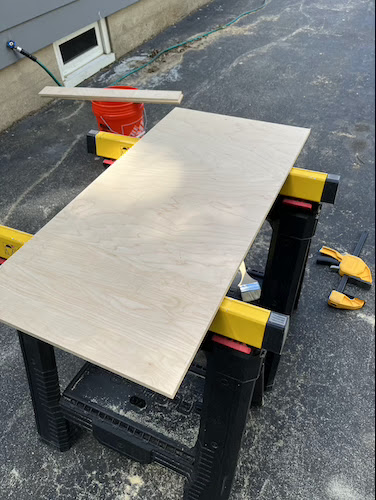
I don't really have fancy tools for cutting plywood. The only tools that I use are a circular saw with 2 different blades, T-Square(48 in), cutting guide, 2 clamps, 2 sawhorses, and a pencil.
A table saw would be really convenient for certain cuts if I had it, but I'm just so used to what I have now.
The reason why I have two different blades for the circular saw is because you need to use different blades for different cuts.


When you cut plywood along the grain, that's rip cutting(left picture above). But when you cut it against the grain, that's cross cutting(right picture above). For the rip cut, you need to use a framing blade which usually has 24 teeth. For the cross cut, you need a finishing blade which usually has more than 40 teeth. My finishing blade has 60 teeth.
That being said, I change my blades a bunch of times while cutting plywood.
You can be smart for this though. Just plan your cuts beforehand so you can limit the amount of times you need to change the blade.
Anyway, the first thing I do to prepare for a cut is to place a piece of plywood, the T-Square, and a pencil on the sawhorses. If I have to cut a full 4 x 8 plywood, I usually use some studs on the ground instead of the sawhorses. But I try not to bring 4 x 8s home because I need to rent a truck for that since I have a small car. So I usually ask a store employee to cut it in half either 2 x 8 or 4 x 4 at the store. Sometimes I really need to cut the 4 x 8 by myself because I need a specific size.
Next, I measure and mark where I need to cut on the board with a pencil. I make two marks at the end sides of the plywood.
Let's say I need to cut a piece 4.25 inches deep out of the plywood board.
After marking the board, I place the cutting guide and two clamps on the top and then adjust the depth of the circular saw to 0(zero). I do this so I can place it on the top of the plywood to find where the saw should be located with the guide without the blade scratching the board.
To position the saw with the cutting guide, I make the point at either 1 or 2(picture above) so the saw covers the pencil line that I marked completely. This could be a little tricky to understand by just reading this post, but it's important if you want to cut it exactly. Depending on which side of the plywood you measured from, either point 1 or 2 in the picture above has to cover the pencil mark. If you keep the pencil mark in the middle of the point 1 and 2, it is not gonna be 4.25" when you cut because of the blade thickness.
Once I know where to position the saw with the cutting guide, I fix the guide to the plywood with 2 clamps. Then, it's finally time to cut it!
Don't forget to set up the depth of the saw again before actually cutting. This time, I changed to a little over 1/2" because I was cutting 1/2 plywood. when everything is ready, I just run the circular saw along the cutting guide and cut.
There we have some cut plywood pieces!!
After cutting all my pieces I erase the pencil marks and sand them all.
I usually use 220 grit sand paper, but it all depends what kind of wood and the roughness and condition of the surface. I also make sure to smooth out the end grain as much as possible because I patch it with the pink spackling if I need to, instead of using edge banding. I'm sure I will post about that too in the future.
So, this is how I cut plywood for my DIY wood projects! Next time, I will come back with my DIY dresser making episodes. Until then :)


Comments
Post a Comment